
Composite applications in WPF: Part 1 - Setting it up
I'm mainly a web and integration kind of developer. I work with HTML, databases, services and getting it all fit together. Next year 2013, I will need to be up to date on WPF and that is why I decided to run a short blog series about building composite applications in WPF.
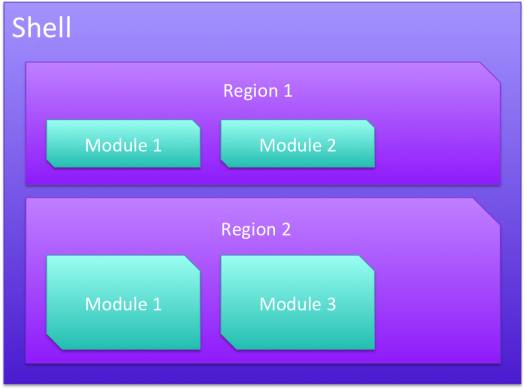
Modularity in a UI, means that you have a shell and you fill that shell with modules that composes the application. These modules will be added dynamically and they will be able to integrate and communicate with one another. Such composite application will surely have a high rate of complexity in its composition, but near extreme cohesion in its modules. In this example I will only have one module (to begin with) and I will use MEF (managed extensibility framework) for composing the application.
Creating the application
Start with creating a new WPF Application project. You will get a solution with one project, containing App.config, App.xaml and MainWindow.xaml. MainWindow is our application shell.
Before doing anything else, we will include Prism and Prism Mef Extensions. It is the MVVM library of my choosing. There are other WPF MVVM libraries out there, but Prism seems to be the most commonly used.
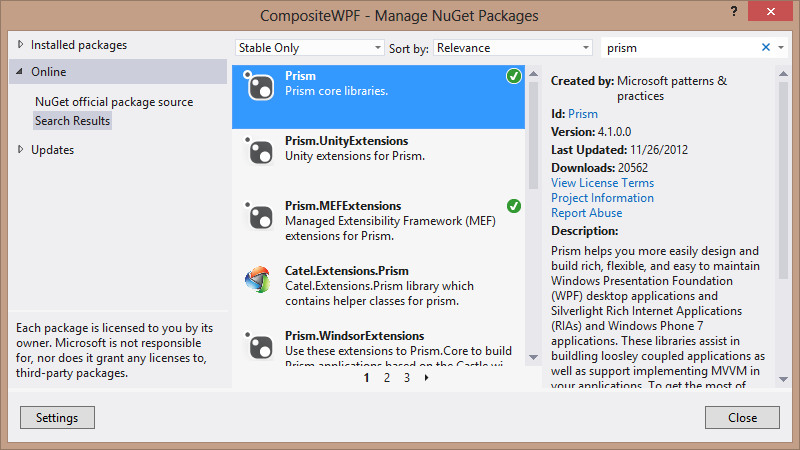
Also, make a reference to System.ComponentModel.Composition which should be located in your GAC. This will be needed for all interaction with the MEF container.
Now we're going to create a class called Bootstrapper. It will setup Prism, the MEF container and load modules.
public class Bootstrapper : MefBootstrapper
{
    protected override System.Windows.DependencyObject CreateShell()
    {
        return new MainWindow();
    }

    protected override void InitializeShell()
    {
        base.InitializeShell();

        Application.Current.MainWindow = (MainWindow)this.Shell;
        Application.Current.MainWindow.Show();
    }

    protected override IModuleCatalog CreateModuleCatalog()
    {
        return new ConfigurationModuleCatalog();
    }

    protected override void ConfigureAggregateCatalog()
    {
        base.ConfigureAggregateCatalog();

        // Add this assembly
        this.AggregateCatalog.Catalogs.Add(new AssemblyCatalog(typeof(Bootstrapper).Assembly));

        // Modules are copied to a directory as part of a post-build step.
        // These modules are not referenced in the project and are discovered by
        // inspecting a directory.
        // Projects have a post-build step to copy themselves into that directory.
        DirectoryCatalog catalog = new DirectoryCatalog(".");
        this.AggregateCatalog.Catalogs.Add(catalog);
    }
}
}
InitializeShell will create the MainWindow, also called the Shell. CreateModuleCatalog will create the module container and ConfigureAggregateCatalog will find modules and add them to the running instance. In our case, we will look for any DLL in the directory of the running program.
We need to bootstrap the bootstrapper from App.xaml.cs.
    Bootstrapper bootstrapper = new Bootstrapper();
    bootstrapper.Run();
}
}
MainWindow is our shell that will define regions where we can place modules. In this example we'll define two regions, a button region for loading modules and a content region.
<Window.Resources>
    <!-- Button Bar Panel -->
    <Style x:Key="button_panel" TargetType="StackPanel">
        <Setter Property="Orientation" Value="Horizontal" />
        <Setter Property="Background" Value="Beige" />
        <Setter Property="DockPanel.Dock" Value="Top" />
    </Style>

    <!-- Content Region Panel -->
    <Style x:Key="content_panel" TargetType="DockPanel">
        <Setter Property="DockPanel.Dock" Value="Bottom" />
    </Style>

    <!-- Region -->
    <Style x:Key="region" TargetType="ItemsControl">
        <Setter Property="Padding" Value="5" />
    </Style>
</Window.Resources>

<DockPanel>
    <StackPanel Style="{StaticResource button_panel}">
        <ItemsControl prism:RegionManager.RegionName="ButtonRegion" Style="{StaticResource region}" />
    </StackPanel>
    <DockPanel Style="{StaticResource content_panel}">
        <ItemsControl prism:RegionManager.RegionName="ContentRegion" Style="{StaticResource region}" />
    </DockPanel>
</DockPanel>
</Window>
I've included styles directly into the Window.Resources for brevity, but you should extract these into a ResourceDictionary. Now you can start and run the shell. It won't contain much as we haven't created any modules yet.
Your first module
Create a new WPF User Control Project in the same solution. I will call mine CompositeWPF.ShoeSize. Delete the default user control and create a project structure like this image.
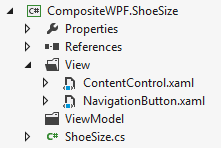
ShoeSize.cs is our module entry point that will bootstrap the module.
[ModuleExport(typeof(ShoeSize))] public class ShoeSize : IModule { private IRegionManager regionManager;
[ImportingConstructor]
public ShoeSize(IRegionManager regionManager)
{
    this.regionManager = regionManager;
}

public void Initialize()
{
    // add views to regions
    regionManager.RegisterViewWithRegion("ButtonRegion", typeof(NavigationButton));
    regionManager.RegisterViewWithRegion("ContentRegion", typeof(ContentControl));

}
}
The region manager is our connection to the Shell, and our entry point for adding views to regions. In case you want to run the application at this point you need to put the [Export] attribute on the views code behind in order to get it to work.
Model View ViewModel
Everything we've done so far is about the composite application model. We really haven't touched the main subject, MVVM yet. The thought here is to create a poco class that represents the view, the viewmodel. Then you databind the view to the viewmodel leaving the view extremly bare when it comes to application logic. The viewmodel will take model object in order to carry out operations, like querying a webservice.
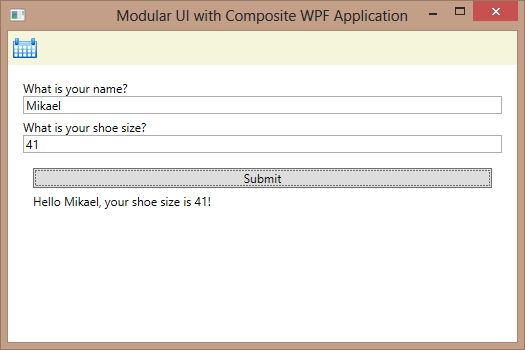
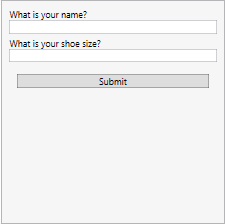
Let's start with the viewmodel for our content. We want to ask, what is your name? what is your shoe size and then produce a message that concatenates that information into a message. Consider the following viewmodel.
public class ContentViewModel : INotifyPropertyChanged
{
private string name;
private int shoeSize;
private string message;
public event PropertyChangedEventHandler PropertyChanged;

public ContentViewModel()
{
    SubmitCommand = new DelegateCommand<object>(this.OnSubmit, this.CanSubmit);
}

public string Name
{
    get { return this.name; }
    set
    {
        if (this.name != value)
        {
            this.name = value;
            NotifyPropertyChanged();
        }
    }
}

public int ShoeSize
{
    get { return this.shoeSize; }
    set
    {
        if (this.shoeSize != value)
        {
            this.shoeSize = value;
            NotifyPropertyChanged();
        }
    }
}

public string Message
{
    get { return this.message; }
    set
    {
        if (this.message != value)
        {
            this.message = value;
            NotifyPropertyChanged();
        }
    }
}

public ICommand SubmitCommand { get; private set; }

private bool CanSubmit(object arg)
{
    return true;
}

private void OnSubmit(object arg)
{
    this.Message = string.Format("Hello {0}, your shoe size is {1}!", Name, ShoeSize);
}

private void NotifyPropertyChanged([CallerMemberName] string propertyName = "")
{
    if (PropertyChanged != null)
    {
        PropertyChanged(this, new PropertyChangedEventArgs(propertyName));
    }
}
}
This tells us that the content has a Name, ShoeSize and Message property. Data can be submitted in the SubmitCommand and on that command, the Message should be set to "Hello Mikael, your shoe size is 41.". All this code is testable and does not have any reference to UI or Windows components. How does the XAML markup for the view look like?
    <!-- Represents a row in the form -->
    <Style x:Key="row" TargetType="DockPanel">
        <Setter Property="Margin" Value="0 0 0 5" />
    </Style>

    <!-- Input element in the grid -->
    <Style x:Key="label" TargetType="TextBlock">
        <Setter Property="DockPanel.Dock" Value="Top" />
    </Style>

    <!-- Input element in the grid -->
    <Style x:Key="input" TargetType="TextBox">
        <Setter Property="DockPanel.Dock" Value="Left" />
        <Setter Property="Width" Value="auto" />
    </Style>

    <!-- Submitbutton -->
    <Style x:Key="submit" TargetType="Button">
        <Setter Property="Margin" Value="0 0 0 5" />
    </Style>


    <!-- What is your name? -->
    <clr:String x:Key="name_content">What is your name?</clr:String>

    <!-- What is your shoe size? -->
    <clr:String x:Key="shoesize_content">What is your shoe size?</clr:String>

    <!-- Submit button text -->
    <clr:String x:Key="submit_content">Submit</clr:String>
</UserControl.Resources>

<StackPanel Style="{StaticResource wrapper}">
    <DockPanel Style="{StaticResource row}">
        <TextBlock Style="{StaticResource label}" Text="{StaticResource name_content}" />
        <TextBox Style="{StaticResource input}" Text="{Binding Path=Name}" />
    </DockPanel>

    <DockPanel Style="{StaticResource row}">
        <TextBlock Style="{StaticResource label}" Text="{StaticResource shoesize_content}" />
        <TextBox Style="{StaticResource input}" Text="{Binding Path=ShoeSize}" />
    </DockPanel>

    <StackPanel Style="{StaticResource wrapper}">
        <Button Style="{StaticResource submit}" Command="{Binding SubmitCommand}" Content="{StaticResource submit_content}"></Button>
        <TextBlock Text="{Binding Message}"></TextBlock>
    </StackPanel>
</StackPanel>
</UserControl>
This will produce the following UI.
Now, all we need to do is to connect the view to the viewmodel. We do this in the view code behind.
We have now successfully created a composite application, where a module is loaded dynamically into the Shell with content.
Navigation
We still have a navigation button to take care of. The focus here is that the content should not be visible until we pushed the button. Let us look at the view of the button first.
<UserControl.Resources>
    <Style x:Key="icon" TargetType="Button">
        <Setter Property="Width" Value="24" />
        <Setter Property="Height" Value="24" />
        <Setter Property="Padding" Value="0" />
        <Setter Property="Background" Value="Transparent" />
        <Setter Property="BorderThickness" Value="0" />
    </Style>

    <BitmapImage x:Key="simple-icon" UriSource="../Resources/icon.png" />
</UserControl.Resources>

<Grid>
    <Button Style="{StaticResource icon}" Command="{Binding NavigateCommand}">
        <Image Source="{StaticResource simple-icon}" />
    </Button>
</Grid>
</UserControl>
In the viewmodel we need to specify the NavigateCommand. This command should publish a navigation event in the event aggregator. Later we will subscribe to that event and decide what to do. The viewmodel looks like this.
[Export] public class NavigationViewModel { private IEventAggregator eventAggregator;
[ImportingConstructor]
public NavigationViewModel(IEventAggregator eventAggregator)
{
    this.eventAggregator = eventAggregator;
    this.NavigateCommand = new DelegateCommand<object>(this.OnNavigate, this.CanNavigate);
}

public ICommand NavigateCommand { get; private set; }

private bool CanNavigate(object arg)
{
    return true;
}

private void OnNavigate(object arg)
{
    this.eventAggregator.GetEvent<NavigationEvent>().Publish("ContentRegion");
}
}
public class NavigationEvent : CompositePresentationEvent<string> { }
Since the constructor here is not empty we need to let the MEF container to resolve the dependency for us. This means that we need to do the codebehind of our view a bit different.
Now, each time we push the button a NavigationEvent is published. We need to subscribe to this event, and I choose to do this in the ShoeSize module. When the event is triggered I want to tell the region manager to navigate the content region to the ContentView. This looks like the following.
[ModuleExport(typeof(ShoeSize))] public class ShoeSize : IModule { private IRegionManager regionManager; private IEventAggregator eventAggregator;
[ImportingConstructor]
public ShoeSize(IRegionManager regionManager, IEventAggregator eventAggregator)
{
    this.regionManager = regionManager;
    this.eventAggregator = eventAggregator;
}

public void Initialize()
{
    regionManager.RegisterViewWithRegion("ButtonRegion", typeof(NavigationButton));
    this.eventAggregator.GetEvent<NavigationEvent>().Subscribe(NavigateTo);
}

private void NavigateTo(string regionName)
{
    regionManager.RequestNavigate(regionName, "ShoeSizeContent");
}
}
Now only one thing remain. We need to name the view to "ShoeSizeContent" in order for MEF to find it as it is resolved. So we need to revisit the content view codebehind and make sure that the export is named.
Summary
We have looked at how to build composite applications with WPF, the basics. The plan is to continue with advanced techniques, how modules can communicate with each others, how to handle subregions and dependency between modules.